Method for Balancing Your R/C Aircraft Using the
FAA's Aircraft Weight and Balance Handbook
By: Marl Bell
I’ve built many ARF kits during the 17 years or so that I’ve been in this hobby. One of the final steps in completing an ARF is to make sure the aircraft is properly balanced. I was never really fond of this step as it required placing my model upside down on a rather precarious balancing device. I’m sure many of you have used that “fine” piece of equipment manufactured by Great Planes. My greatest fear was that my model, in which I had invested significant time and money, would fall off the balancer. It never happened, but I came close. Their claim is that the balancer will accommodate models weighing up to 40 lbs. I just can’t imagine putting a 40-lb airplane on this balancer- or even a 20-lb plane for that matter. Even though the two socket caps that come into contact with the wing are padded with rubber, that’s a lot of weight to distribute over a small area. I think it’s a real possibility that airplanes built with soft balsa sheeting or Styrofoam could be dented. I believe there are several other drawbacks to using this device. A big one for me is that shifting weight inside your model in order to achieve recommended CG becomes a tedious, trial-and-error process where every attempt requires one to remove the model from the balancer, shift weight inside the model (or, heaven forbid add weight) and then return it to the balancer. There has to be a better way...
|
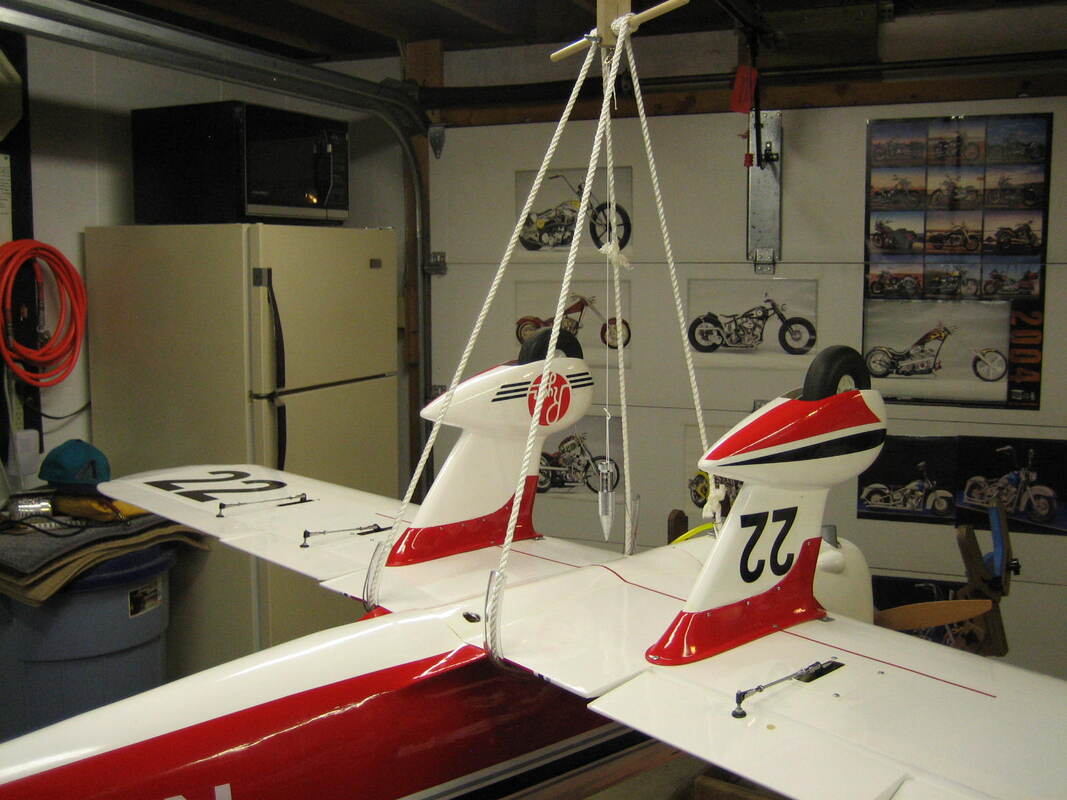
Then a fellow club member told me about a device for balancing RC airplanes that can accommodate almost any size model including larger, heavier ones. It’s called the Vanessa CG Machine. If you do an internet search for this, you’ll find many different implementations of the basic idea. Your airplane is supported by a sling which is suspended by a rope that is attached to the ceiling or to a rafter in your workshop. You’re able to level your model by twisting a horizontal dowel while observing a bubble level. A plumb bob is situated above your model and “points” to the CG of your aircraft. In my mind, this method of determining the location of your model’s CG is far superior to the “two-rod” contraption described above.
As I began to put together a parts list to build the “Vanessa,” I got to thinking: “How is center of gravity measured for full-scale aircraft?” I mean, do they hoist the entire aircraft into the air with a giant crane, flip the airplane upside down and turn it into a giant teeter-totter to see if it is nose or tail heavy based on its recommended CG location? That seemed silly and impractical. |
After some searching on the internet, I came across the FAA’s Aircraft Weight and Balance Handbook. After reading a few pages, I felt that I had hit "pay dirt." This handbook explains weight and balance theory and provides some simple methods of determining the center of gravity on full-scale aircraft. Happily, these methods are perfectly applicable to our RC aircraft.
|
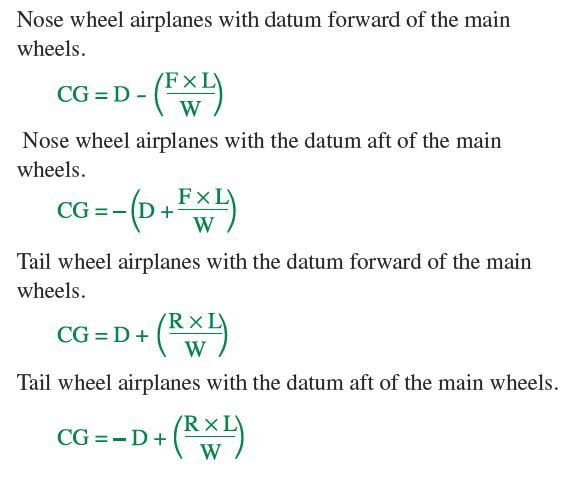
As I perused the Handbook, I began to see how it all comes down to weighing the aircraft at the wheels and measuring the distances between them. The Handbook is certainly great reference material and includes much information about how CG changes with the loading of cargo and people in private and commercial aircraft and much more. I was excited to find in the handbook, four simple formulas that can also be applied to the calculation of CG in our RC airplanes. Which formula you use depends on which aircraft configuration you have. The formulas are found on page 36 and are for:
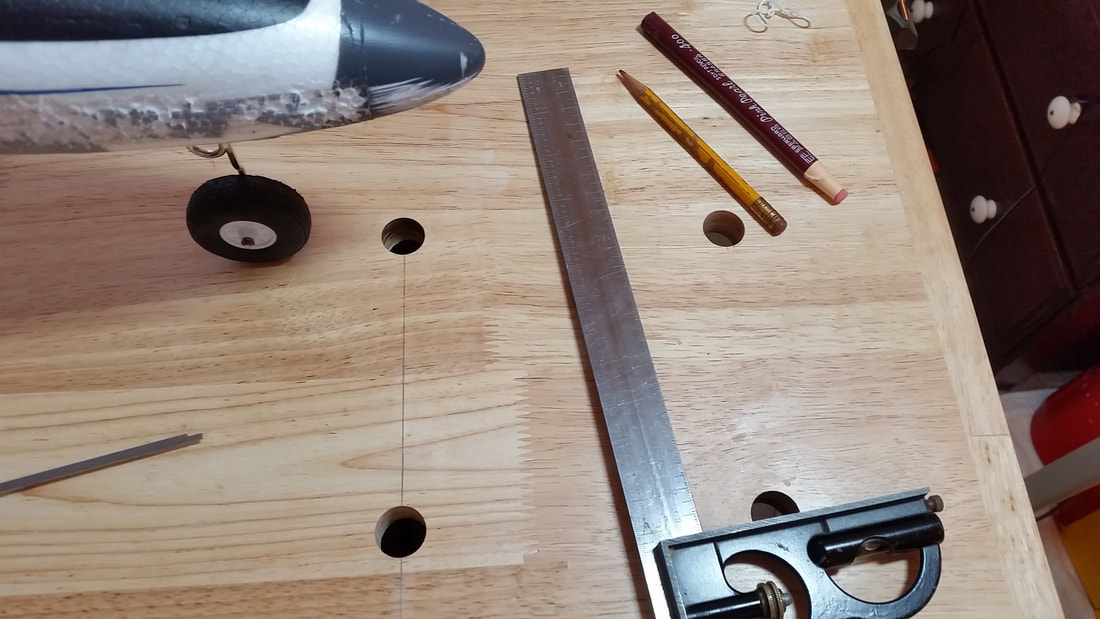
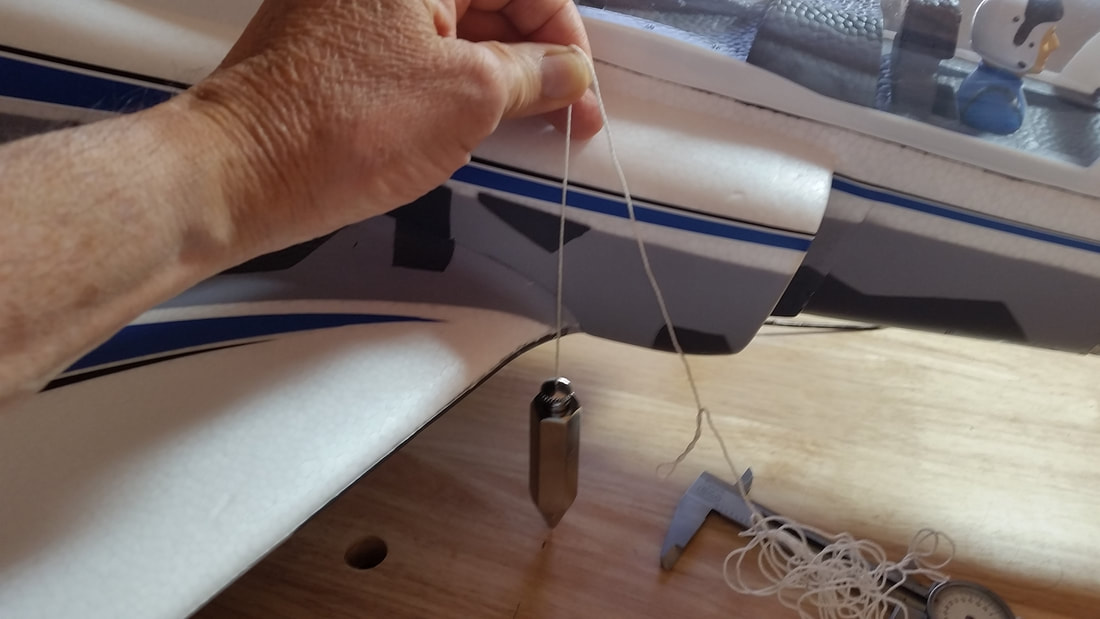
The “datum” is the reference point from which distance measurements are made. In our models, the datum is usually specified as being the leading edge of the wing at the wing root. |
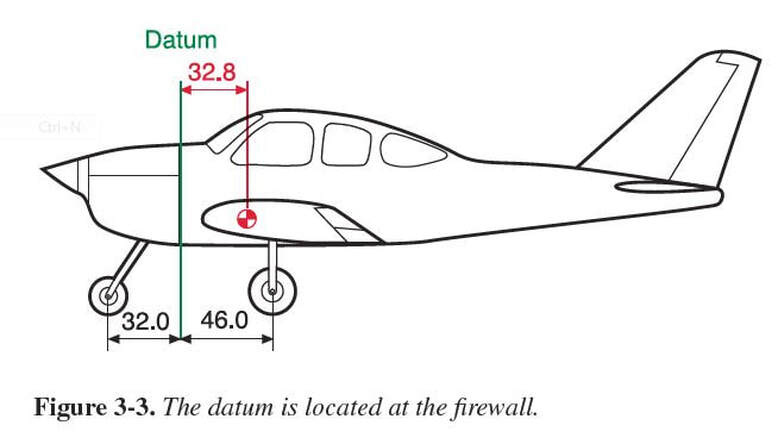
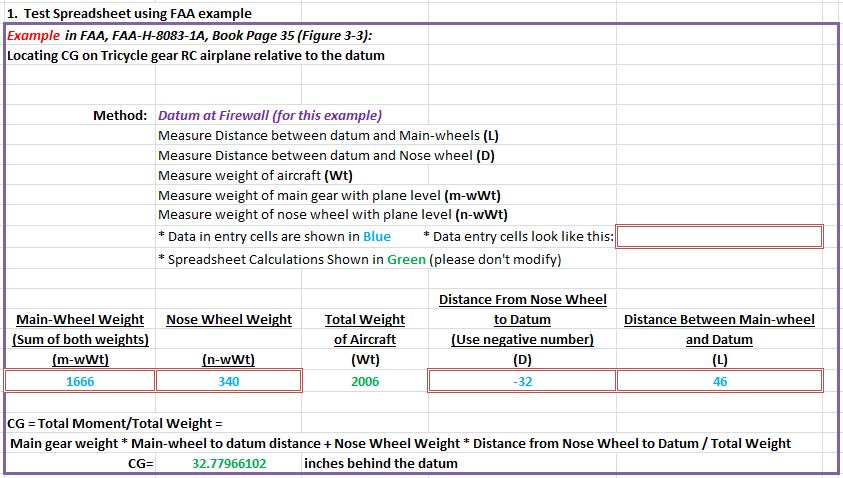
Since I have a digital postal scale that measures in grams (and more than a few rulers), and I had an immediate need to calculate CG on two of my aircraft (types 1 and 3 above), I got started. I began by entering weights and measurements into a handheld calculator and writing down my answers using pencil and paper. I found this to be tedious, so I decided it would be easier to use a spreadsheet (like Microsoft Excel). Plus I liked the idea that I could store my aircraft’s CG data on my computer. So I wrote an Excel spreadsheet that calculates CG for nose wheel and tail wheel aircraft whose datums are forward of the main wheels. You can download my spreadsheet HERE. Select from the two tabs at the bottom of the spreadsheet for the correct formula. Figures 3-3 and 3-4 in the FAA Handbook, describe how to calculate CG on an aircraft of "type 1." I tested my calculations by plugging in the values from the FAA Handbook example into my spreadsheet (Screenshot 1 below).
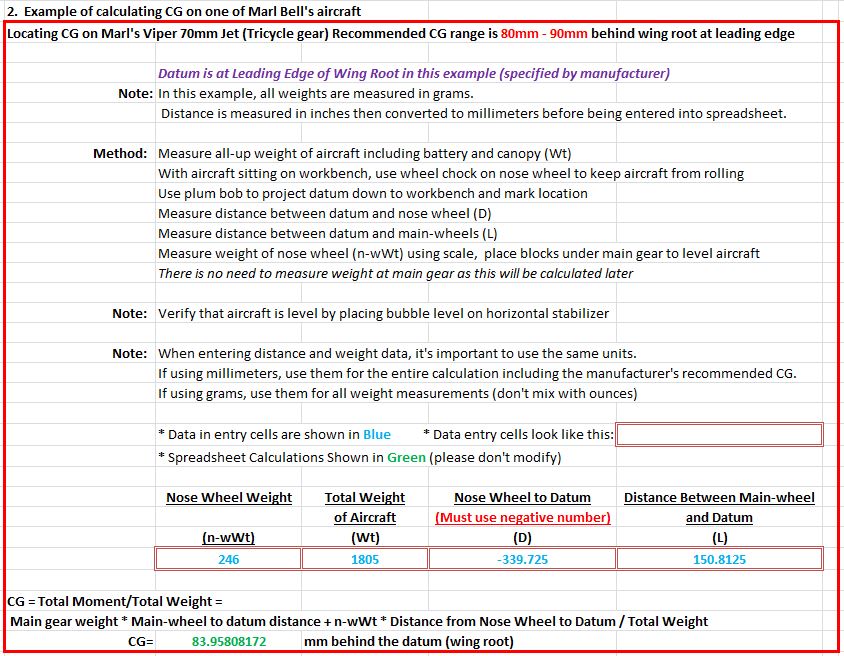
Ok, now it’s time to apply the formula and spreadsheet to a real R/C airplane! Below, is a screenshot (2) from my spreadsheet which I used to measure/calculate CG on one of my airplanes (E-Flite, 70mm Viper EDF):
|
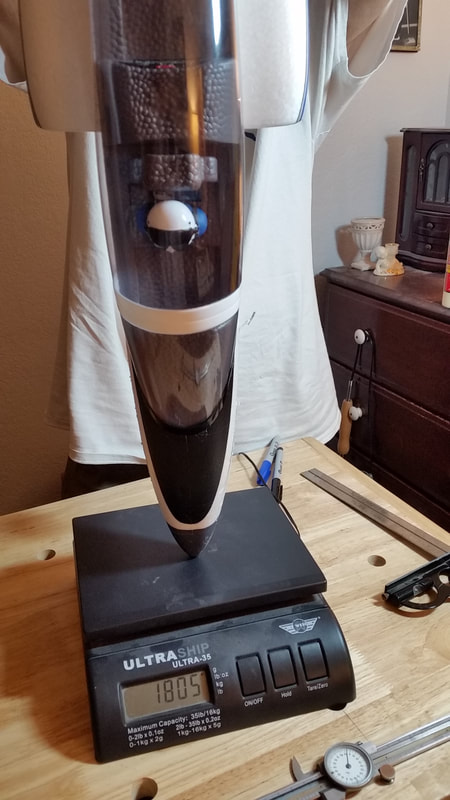
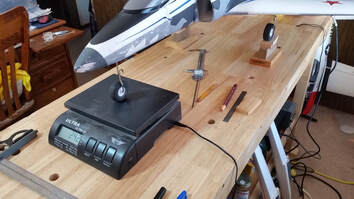
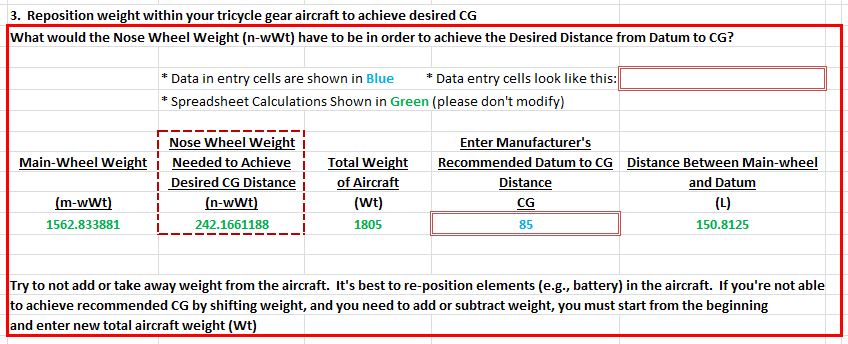
The first time I weighed the nose wheel, I got 246 grams. So the calculated CG (83.9 mm) was fairly close to the middle of the CG range specified by the manufacturer (80 - 90 mm). But what if you wanted the CG to be precisely in the middle of the specified range (85 mm)? By rearranging the formula in the spreadsheet and solving for n-wWt, you can calculate what the nose wheel weight has to be in order to achieve this.
|
In the spreadsheet screenshot above (3), the nose wheel weight needed to achieve 85 mm from the leading edge of the wing (at the root) has been calculated. I shifted back the position of the battery in my 70 mm Viper EDF until I got a nose weight of 242 grams. I used the spreadsheet to verify that this new nose wheel weight produces the correct CG location (screenshot 4 below).
As a test, I put a mark on the jet 85 mm back from the leading edge wing root. I inverted my model and placed my thumbs at this mark and picked up the plane. It balanced perfectly! On the spreadsheet (screenshot 3), you'll notice that the weight of the aircraft did not change- and of course it wouldn't because I only shifted weight in the model and did not add or subtract any weight. You'll also notice that the "Main-Wheel-Weight" and the "Nose Wheel Weight Needed to Achieve Desired CG Distance," add up exactly to the total aircraft weight of 1805 grams. It's possible that you'll have to add or subtract weight. In that case, you will have re-measure and re-enter the values for (Wt) and (m-wWt) in screenshot (2).
So the above values are examples using my aircraft. If you'd like to enter values from your aircraft into the spreadsheet, you can do that in section 5. You might want to keep the values I entered at (1), (2), (3) and (4) in the spreadsheet for future reference. Also, I left the spreadsheet cells "unprotected" so that you can see what's being calculated.
Yes, I know- this method of calculating CG is probably "overkill" for a small, light model like the E-Flite Viper 70. But it does prove the concept, and I do believe this method of measuring the location of your plane's CG has several unique benefits:
- The tedium of trial-and-error "weight-shifting" within your aircraft to obtain a desired CG is greatly reduced because a "target" nose or tail weight is calculated and can then be read directly from a digital scale which takes the guesswork out of setting your CG.
- Much larger aircraft can be safely accommodated because they sit on a stable surface while weight and distance measurements are being made.
- It takes advantage of the fact that digital postal scales are now common and are reasonably priced and fairly accurate.
- It’s possible to measure the weight at each wheel individually and add the weights together to get the total weight of the aircraft. This makes it possible to get the total weight of an aircraft even though the aircraft’s weight may exceed the maximum capacity of the scale.
- A spreadsheet program such as Microsoft Excel makes it easy to save all your airplane's CG and weight data.
- You get the added benefit of knowing how much your airplane actually weighs.
- Since we are all "modelers," this method is the most "prototypical" because it is used to measure CG on full-scale aircraft :-)
